Laser Head Kit

https://tevarg-mekanika-odoo.odoo.com/web/image/product.template/4272/image_1920?unique=0c0212a

Powerful, precise laser head, specialized in engraving a wide range of materials with exceptionally high resolution. Its microscopic beam has a very high power density, enabling it to cut thin plates with precision.

867.15 € 867.15 EUR 1,037.20 € VAT Excluded

1,037.20 € VAT Excluded

Not Available For Sale

    This combination does not exist.

    Terms and Conditions

    What's in the Kit?


    The kit contains everything you need to get your laser up and running on your Mekanika CNC machine, with no hassle. It includes:

    • 1x PLH3D-XT-50 laser head.
    • 1x Magnetic docking station with aluminium protective cover.
    • 1x CNC adapter unit, with two security keys.*
    • 1x Desktop power supply, 19V 2.5A.
    • 1x Laser safety glasses.
    • 1x Height reference tool.
    • 1x Steel interface plate with screws and nuts.
    • All the necessary signal cables.

    *If you own a Pro Mk1 or an Evo from 2021, please contact us to assess the compatibility with your machine. 

    Technical Specifications


    Laser head model

    Opt Lasers PLH3D-XT-50

    Laser head dimensions

    40 x 40 x 140 mm

    Laser head weight

    300 g

    Noise

    58 dBA

    Max. power consumption

    30 W

    Optical output power

    6 W

    Beam spot size

    50 x  4 µm

    Resolution for engraving applications

    500 DPI

    Laser diode wavelength

    450 nm

    Modulation

    0 - 5 V PWM, 10 kHz

    Typical Workflow


    Plug-and-play Installation

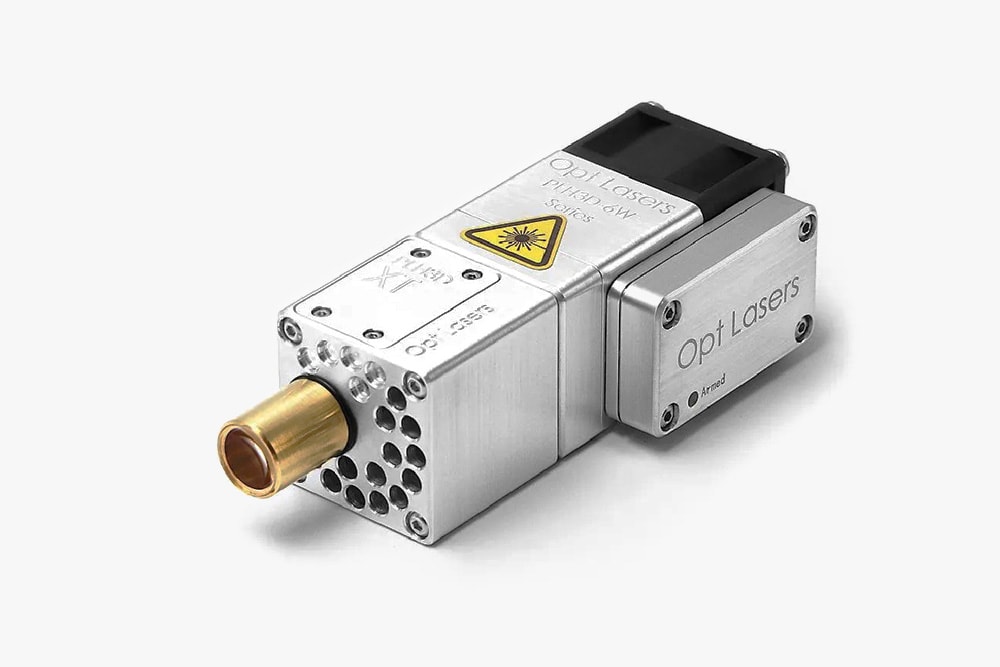
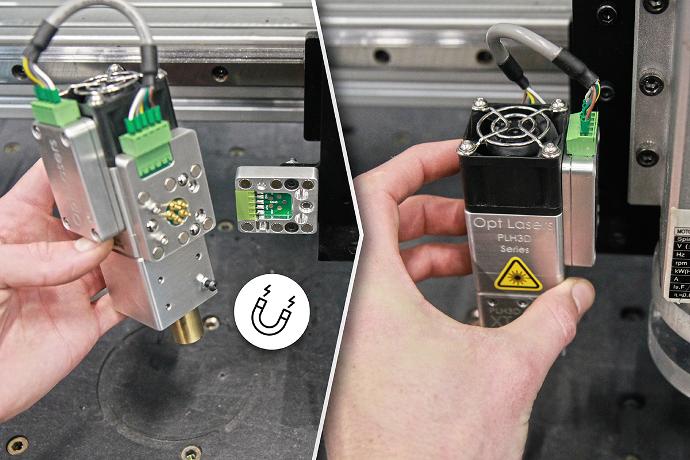
    Install the interface plate and the docking station, plug the cables and you can start! Simply attach the laser head to the magnetic docking station, it will automatically align and be powered up.

    When you've finished using the laser, simply remove it and place the protective cover on the docking station, making sure it's dust-free from the milling operations that will be carried out on your CNC machine.


    Two Tool Heads, One Workflow

    Experience the easy integration of this new laser functionality into your familiar workflow. Use the same user-friendly interface and software you're accustomed to with your spindle. Transitioning between milling and laser operations is as simple as the push of a button.

    Focal length adjustment is also very simple: you can use the same tool measurement probe supplied with your CNC machine. No need to slowly jog the Z-axis and manually check with a height gauge.

    Regarding the G-code, while you have the flexibility to use any CAM software of your choice, we recommend using the free Opt-lasers G-code generator for cutting and line engraving. For those seeking more advanced engraving capabilities, we recommend using Lightburn that also gives great results.


    Application Examples


    Detailed Engraving or cutting soft materials

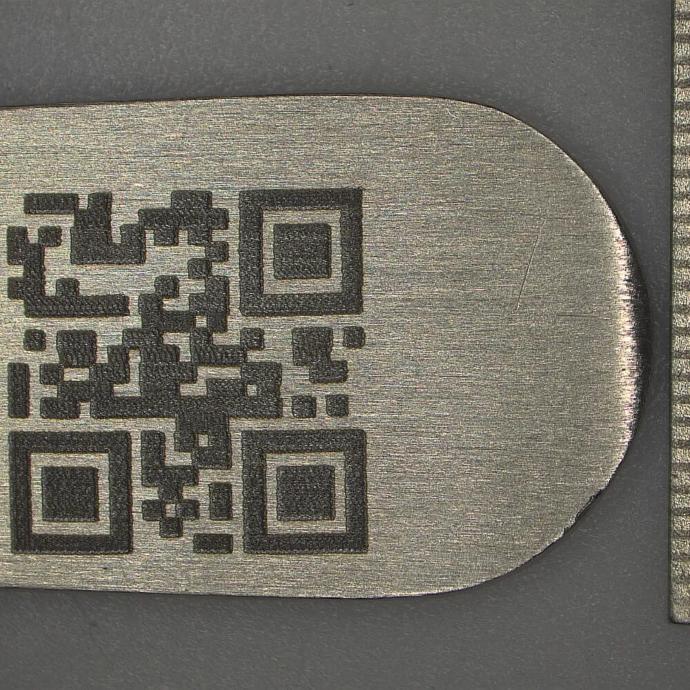
    This laser head can achieve < 50 µm precision for engraving on materials like wood, cardboard, paper, foam, rubber, acrylic or leather, to name a few.

    This very small beam also allows to cut materials with thin even cut lines. Here are a few cutting capability examples:

    • 10mm soft wood in 5 passes at 300 mm/min*
    • 20mm poly foam in 4 passes at 780 mm/min*
    • 2mm rubber in 1 pass at 1000 mm/min
    • 1.8mm microsurfaced impact acrylic in 10 passes at 900 mm/min*

    *using the high-pressure air nozzle assist
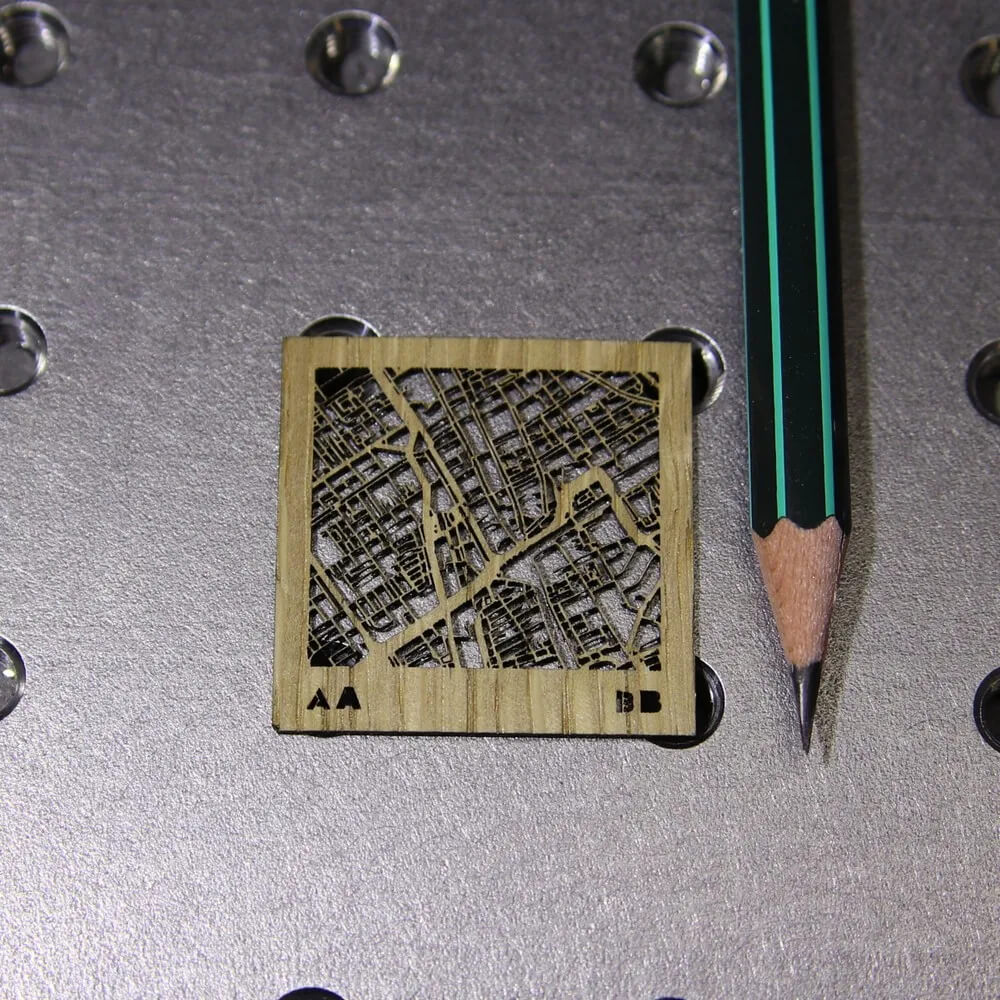
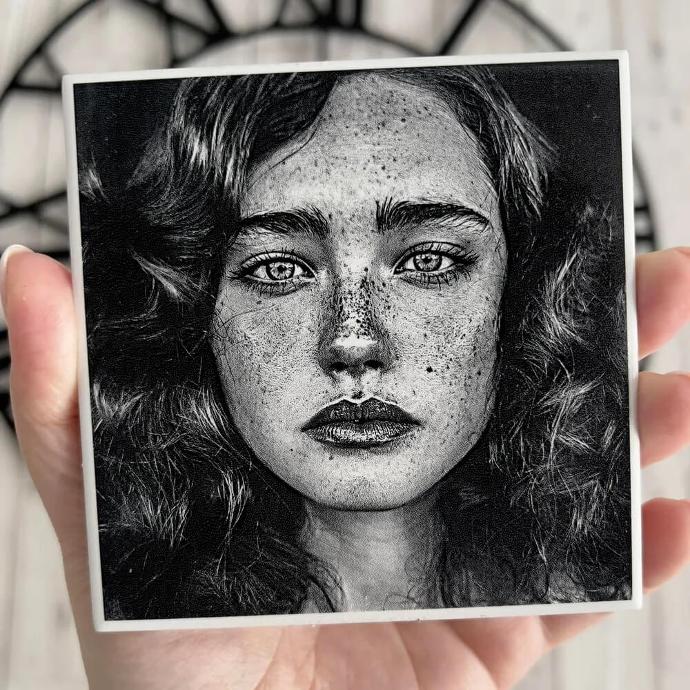
    Ultra-HD Engraving

    Up to 500 DPI engraving capacity on materials like ceramic tiles, with significantly faster results than other laser heads without anamorphic optics.

    Accurate Metal Engraving

    The microscopic beam spot allows to make precise and small engravings in a wide variety of hard materials, including stainless steel or aluminium.

    See the Laser in Action


    FAQ


    The laser kit is compatible with our current EVO, PRO, and FAB machines. For users with machines purchased before June 2021, please contact us to check compatibility.

    Generally, a laser operates for approximately 20,000 to 30,000 hours. Note that in case of malfunction, it often suffices to replace the diode to restore the laser's proper functioning.

    We recommend two software options for generating G-codes:

    • Opt Lasers is a free software, albeit not the most user-friendly. It performs well, especially for beginners interested in engraving contour lines. It also allows image generation. The produced G-code is clean and well-suited for our machines. Opt Lasers will soon include the configuration for our Mekanika machines directly in its settings. Opt Lasers is not compatible with MAC.
    • Lightburn is a paid software (€50 for a lifetime licence) with more advanced drawing features, particularly suitable for photo engravings. Lightburn doesn't directly integrate the settings for our machines, but we'll be happy to provide them.

    We have a product presentation video of the laser head. Which explains how it works.
    And a tutorial on Lightburn, our recommended software. Which explains how to prepare G-Code for the machine and how to use it on our machines.

    Our laser head is capable of engraving and cutting various materials such as wood, cardboard, paper, foam, rubber, acrylic, or leather, to name a few. You can find the complete list of materials along with corresponding speed tests on the Opt Lasers website. Engraving is the simpler operation, requiring a single pass at an appropriate speed, while cutting for many materials requires multiple passes to allow the laser to cut through the material's entire depth. It's important to note that our laser kit was specifically designed as a complementary accessory to our CNC machines. We strongly recommend users primarily use digital milling for cutting and the laser for engraving.

    Plan for 30 minutes for the initial installation of your laser.


    With the magnetic support, it will take you just a few seconds to mount or dismount your laser during your daily use. Detailed instructions will be provided in the upcoming tutorial.

    The focal length adjustment is done automatically using the same Z probe as your digital mill but with a dedicated new button.

    The laser connects alongside your mill and is operated in the same way as the mill: you prepare your G-code, import it into the machine control software, and then switch to "laser" mode. Detailed instructions will be provided in our next tutorial to guide you through this process.

    We primarily developed this accessory for engraving. If you want to cut with the laser, you can install a honeycomb bed on your machine, or for limited cuts, use your spoilerboard as you do with your spindle.

    We do not directly sell the air assist accessory, but you can order it directly from our supplier Opt Lasers if needed.