Wood engraving is a very old artistic technique. Dating back thousands of years, the first uses of this technique are thought to date back to Antiquity. Long associated with antique furniture or relief paintings, woodcutting seems to be making a comeback, enabling increasingly original and trendy creations.

In this article, we'll show you how CNC is a key ally in this addictive technique and, to get you started, we've also included a step-by-step tutorial for creating your own printing stamp.
When to use engraving
We all have in mind a piece of antique family furniture adorned with engraved motifs. Engraving is one of the most ancestral ornamental technique, but the use of this technique went much further than that.
Engraving was used to apply monograms or family crests to furniture. A true symbol of heritage, these pieces of furniture were much sturdier than today's and were handed down from generation to generation.
Depending on the design, the engraving could have symbolic significance. In some cultures, furniture engraving was part of local craft traditions. Although this technique seemed to have gone out of fashion, it is now making a strong comeback, thanks in particular to objects that people wish to personalize.
In today's decorating world, engraving is used to create original works of art or decorative panels to embellish interior spaces. Utilitarian or everyday objects such as jewelry boxes, caskets or photo frames can be personalized using this technique.
The same goes for customizing kitchen utensils such as cutting boards, trays or wooden spoons.
In the commercial field, engraving can be used to create signs or goodies to promote a brand.
Finally, engraving is still used to create furniture, but in a more graphic form, with textured kitchen cabinet doors or geometric patterns that are much more fashionable than the vegetal motifs often found on old furniture.
What are the different types of wood engraving?
There are two different types of engraving: pyrographic engraving, which uses fire to engrave the material, and more traditional "cold" engraving, which uses knives, gouges or milling cutters.
Both techniques are particularly interesting, and can be used to decorate a variety of objects. Hot engraving enables fine engraving and only marks the material over a few millimeters, while cold engraving allows more fantasy and a much more pronounced relief effect.
Hot engraving (pyrography)

Pyrography is particularly well suited to customizing objects such as small paintings, coasters or cutting boards. This particular technique can also be used to customize wooden objects in relief, such as wooden spoons, or even small objects like jewelry (bracelets, pendants or wooden rings).
Pyrography is the most common wood marking technique. Who hasn't tried it at least once? Today, lasers are becoming more and more widespread, making it possible to produce highly precise engravings.
Parameters such as laser power and speed can be adjusted, making it possible to achieve a wide range of effects very easily, much more difficult to achieve with a pyrographic engraver.

Cold engraving
Cold engraving, on the other hand, can be used to create signage or furniture. The use of tools rather than heat creates a high degree of relief, while retaining the natural appearance of the wood, rather than being burnt as with laser engraving, giving a whole new dimension to the work.
When it comes to "cold" engraving, there are two rendering options: intaglio and relief (cameo). The use of jewelry-related terms helps to visualize the rendering.
Intaglio engraving, involves removing material to create incisions or hollows in the surface of the wood. Intaglio engraving is particularly suitable for fine elements that need to be protected from wear and tear, or for patterns or text that appear below the surface of the material.
These hollows can be accentuated with ink, paint or, very much in vogue at the moment, colored resin to accentuate the patterns.

This type of engraving is also used in printing to create stamping dies. Called xylography, this technique involves carving images, motifs or text onto a wooden board. The parts that are not to be seen in the print, the "blanks", are hollowed out. The final motif then appears in relief.
Once the engraving is complete, the ink is applied to the surface of the board, called the matrix, which is then applied to paper. The ink is transferred to create a print. For texts in particular, the lettering is carved in mirror-image so that it can be printed legibly.
Another very interesting intaglio engraving technique comes from Norway and Sweden.
Kolrosing consists in creating a slight notch in the wood with a knife, then filling it with a powder such as contrasting sawdust, ground coffee or cinnamon. As this technique takes a long time to apply, it is particularly suited to decorating small objects such as wooden spoons, coasters, picks and hairbrushes.
In contrast, relief engraving involves removing the material around the motif, leaving it raised from the base surface. This process is often used to create signs, decorative panels and sculpted furniture. More exposed than intaglio patterns, relief patterns are more fragile and likely to wear out over time.

How to use a CNC machine for wood engraving?
Now that the various engraving possibilities are clear, let's see how to test this technique in the workshop. Since the arrival of our laser module, Mekanika CNC machines let you try your hand at all engraving possibilities, both "hot" and "cold" engraving.
1. The advantages of using a CNC over hand engraving
There are many advantages to using a CNC machine. Cutting precision and replicability are amongst them.
Computer-controlled milling/lasering machines are extremely precise.It is possible to control not only the tool path on the two horizontal axes, but also the vertical axis for setting the depth of cut.
Once the file has been created, the pattern can be reproduced quickly and indefinitely, boosting productivity. For mass production, the milling machine enables a larger volume to be engraved in less time.
What's more, while the CNC is running, it's possible to work on other tasks, such as packing orders or creating new patterns.
The machine's versatility makes it possible not only to create simple patterns, but also to engrave much more complex texts or images in great detail, which would take many hours in human hands, or which simply wouldn't be possible to do by hand, such as kolrosing on a large flat surface.
Once you've mastered the use of the CNC machine, you'll be able to make engravings simply and intuitively, even if you're just starting out.
2. Which tools to use for CNC engraving?
As we saw earlier, engraving with the laser module enables you to mark the wood more or less deeply, while following a convex or hollow shape if the object is in 3D.
The milling module, on the other hand, will be your ally if you want to play with the two contrasting renderings of intaglio and cameo. In this article on engraving, we'll begin with a brief overview of intaglio engraving, which doesn't require any advanced knowledge of 3D modelling, as it involves creating a pattern on a flat object.
2.1. Engraving wood with standard end-mills
For intaglio engraving, you can use standard straight end mills (like the one used in our tutorial). The cutter will remove the material inside the desired motif or lettering using the pocket function.

The bulk of the material is removed with a large-diameter end mills, while the finishing touches can be made with a smaller-diameter cutter. This creates reliefs with 90° sides that can be filled with resin, for example.
The disadvantage of using only a straight cutter is that, when it comes to fine details and angles, the round shape of the cutter will invariably leave material in the corners.
To counter this disadvantage and remove as much material as possible, small-diameter milling cutters are used, but machining time is longer and the finish remains unchanged.
2.2. Engraving wood with a javelin end mill
Javelin end mill are mainly used for fine engraving work, lettering and precise details. They are ideal for creating clean lines and fine patterns.

2.3. Engraving wood with a V-bit end mill
V-bit milling cutters are used for deep engraving and complex artistic work. They are ideal for creating three-dimensional shapes and detailed sculptures.

Carving end mills have another specific way of working with wood. Also known as writing cutters, bending cutters, chamfering cutters, laser point cutters, it's a pleasure to watch this cutter at work. The patterns are hollowed out and the cutter leaves a nice chamfer.
The special feature of this cutter is that it needs to follow a different path than the straight cutter. Where a straight cutter follows the contour of a pattern, the V-shaped cutter positions itself in the center of the pattern and hollows it out, playing with the depth of the cut.
This means that the cutter moves up and down along the Z axis as it cuts, which is not the case when using a straight cutter, which maintains the same depth of cut throughout its path along the pattern.
Let's take the example of a teardrop shape: at the tip of this motif, the cutter enters the material by just a few millimetres, so the tip is very detailed. To hollow out the rounded shape of the pattern, the cutter penetrates much deeper into the wood. The material is removed entirely from the inside of the pattern, unlike a round cutter which would leave material in the corners.
A forthcoming article on sign-making will tell you more about this.
1. Generate G-code in Autodesk Fusion 360

Time for action now!
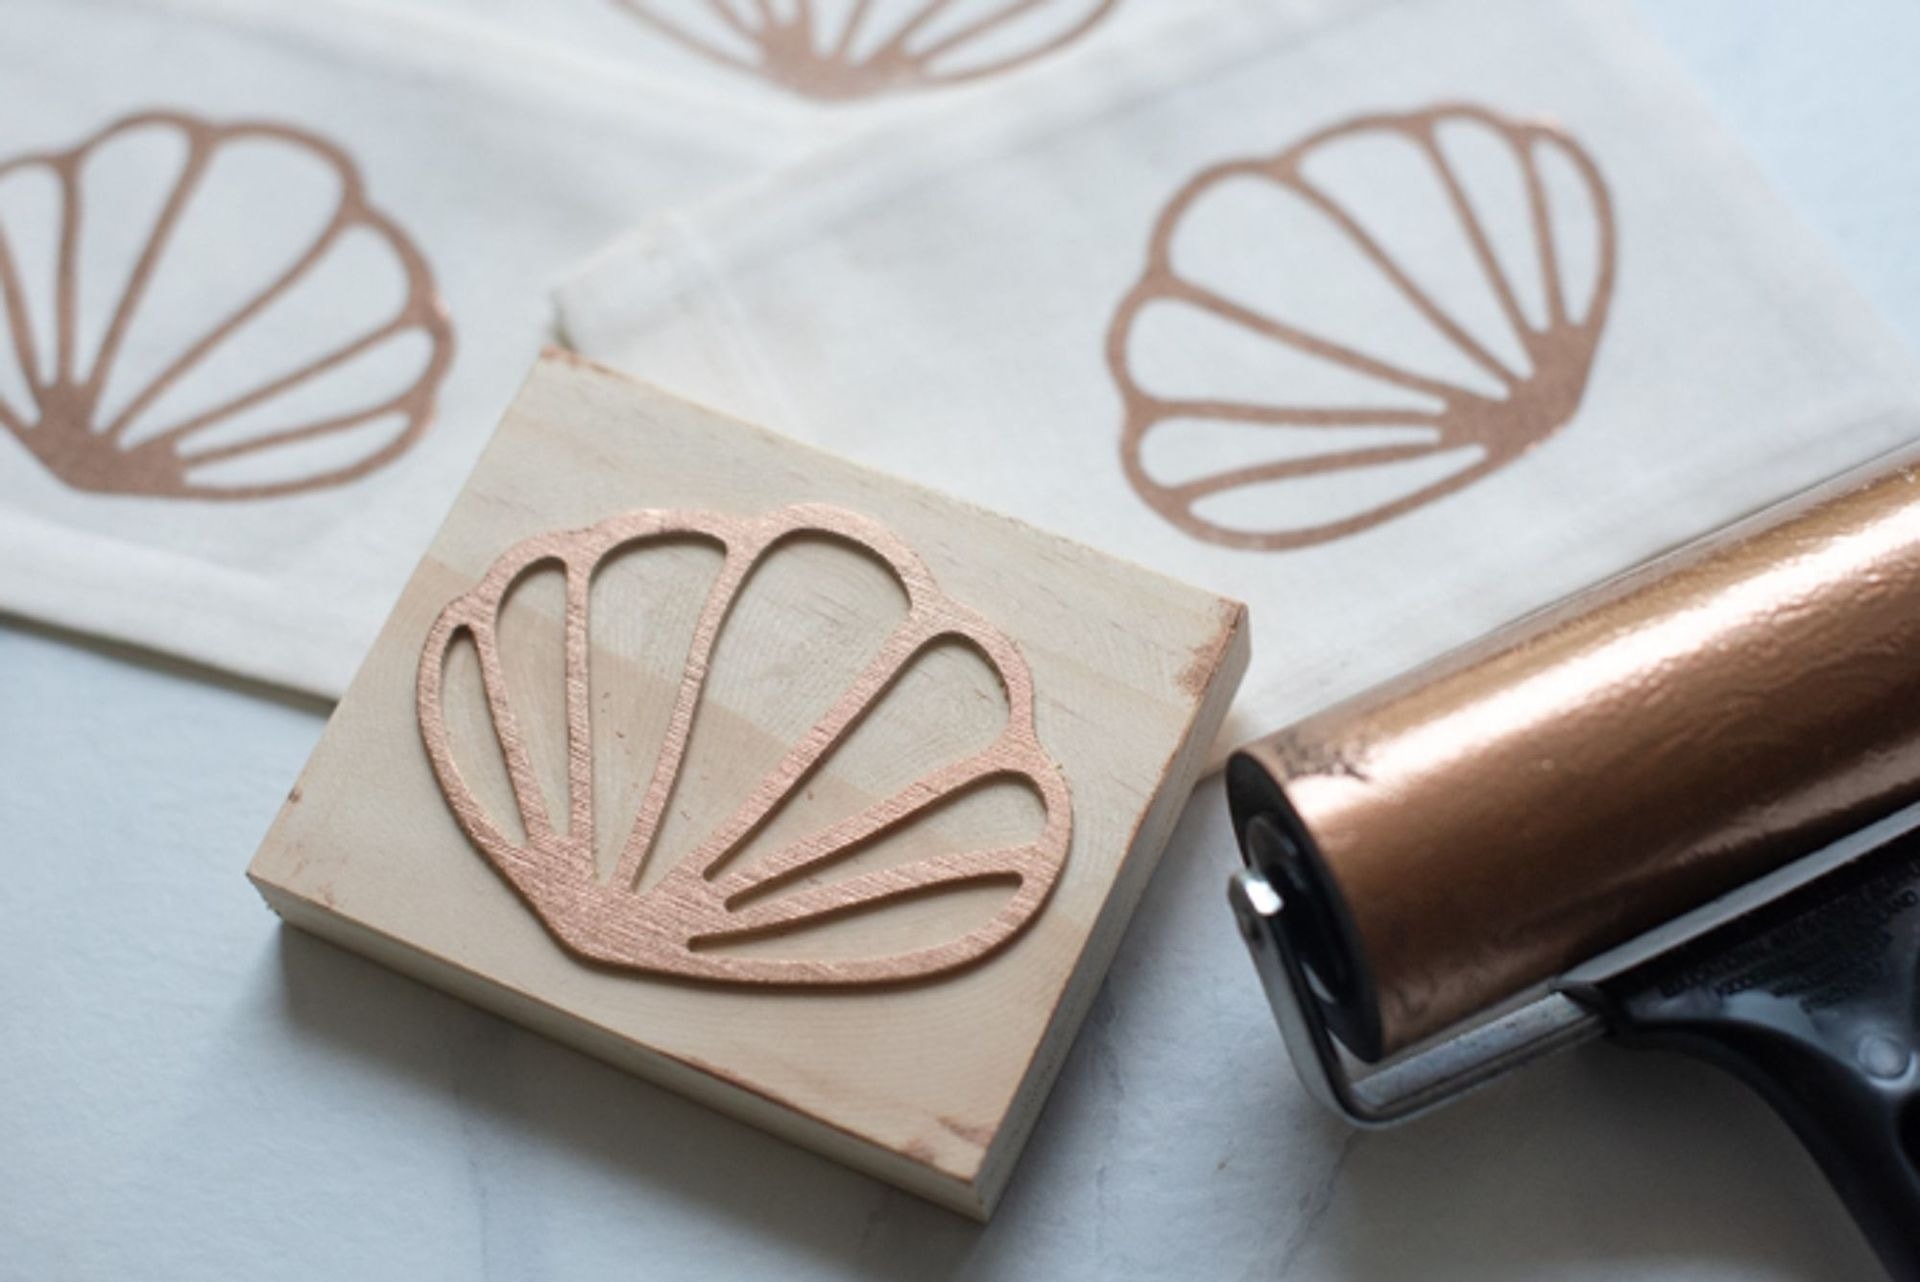
Let's create a wooden printing die for xylography!

To create the pattern, I use CorelDRAW, but you can also use Inkscape.
I draw what I want to print, in this case, a shell. I then draw a rectangle the final size of the die, i.e. 78 by 97 mm.
I center my design in this rectangle. This will be the final shape of the die, but I could have chosen to follow the contours of my design and thus have a shell-shaped die. I save everything in DXF format.
For more details, watch this video explaining how to transform a drawing into a 3D file, which repeats the whole process above.

I start by working on my drawing in the sketch tab of the Fusion 360 software. I import my DXF file. I extrude the pattern at 18 mm, the full height of the wood block in which I want to machine my die. The rectangle is extruded at 16 mm, leaving a 2 mm overhang.

I switch to the manufacturing tab. The configuration menu allows me to define the orientation of my blank, first selecting the Z axis, then the X or Y axis. The blank tab then lets me choose the size of the board in which I'm going to machine my die.
To finish managing my stock, I set the block point in the bottom left-hand corner of my stock so that, in my G-code, the values will always be positive.
It's time to move on to the cutting data choices. I start by entering all my tool parameters in the library . I've chosen a 2-tooth left-hand fishtail cutter with a diameter of 2 mm. The small diameter allows me to have as much detail as possible on my die.
The fact that the cutter has to down cut (cut to the left) will give a better surface finish. Its cutting speed is set at 880 mm/min, and the spindle speed is 20,000 rpm, which is up to you.

For my cutout, I need to create pockets 2 mm deep and create a complete cutout. In the manufacturing tab, I choose the 2D pocket operation. I start by defining the tool, choosing the one I've just created from my library.

I switch to the geometry tab and select the faces I want to machine.

In the pass tab, I remove the stock allowance, activate the multiple depth operation and enter 1 mm as the pass depth. I also click on the bidirectional option, which will allow the tool to cut in both directions, rather than having to return to the same side each time to start cutting, thus saving time.
Finally, in the link tab, I deselect the input and output boxes.

I proceed in the same way to create the tool path for the contour of my matrix and test everything by running a simulation. Once everything is in order, I create my G-code by clicking on post-process in the action tab.
If needed, you can also watch a second video explaining how to transform a 3D file into G-code.
2. Wood engraving on the CNC machine

After powering up the machine, I insert the USB key and search for my file. I synchronize the machine's position with the software by clicking on the Home icon.

Next, it's very important to clamp the workpiece to avoid any vibrations that could impair cutting quality and prematurely damage the tool. I prefer to screw my workpiece directly onto my martyr. I use inserts and screws that are long enough (thickness of the stock and margin to ensure they are correctly screwed into the inserts).
I install my cutter in the spindle. I define my Z by placing the tool probe under the cutter and clicking on the height measurement icon. I then place my cutter in the top left-hand corner of my stock and click on the x and y work coordinates icon. I walk around the machine to make sure there's nothing in the way of the tool path on my worktable and machine belts.
I check the suction system, put on my epi (the gentle sound of a milling machine is slightly powerful!) and then I'm ready to start machining.
Once again, we've filmed the whole process. The video "Preparing your milling machine" is available on our YouTube channel.


On exit, the die is perfect. The down cut milling cutter leaves a very smooth surface. Just for fun, I gave it a quick sanding.

The machining of printing dies is particularly pleasing to the eye and quite interesting for a beginner. When cutting pockets to a depth of 1 mm, the machine doesn't force itself, which is reassuring.
As for G-code creation, the whole process is relatively straightforward. Once the die has been cut, the creative possibilities are endless. Depending on the ink chosen, you can print on paper, cardboard or fabric.
It's also possible to create a die with your company's logo, for customized packaging or T-shirts. Here, the shell shape is very simple, but depending on the motif chosen, the die can be full of detail and nuance.
I've cut my die out of wire wood (the easiest to find in this format), but for those of you who want to try out this technique and get a lot of detail, it might be interesting to machine the die out of end wood.