Introduction
Mekanika's Interface Unit
Our machines come out-of-the-box with an interface unit, which is composed of two elements:
- a 7" or 13" touchscreen (depending on the interface you selected)
- a customized Bluetooth keypad
The touchscreen will allow you to control your machine via PlanetCNC, but also to navigate on the Raspberry Pi if you need to browse your folders, edit some files, or even browse the web.
The Bluetooth keypad offers an alternative to handle your machine easily and intuitively: most of the keys have been remapped to specific functionalities of PlanetCNC and will serve as useful shortcuts to control it.

If you wish to use your own screen, keyboard & mouse as an interface to control the machine, it is of course possible. Simply connect your devices at the back of the control unit and change the resolution of the Raspberry Pi to fit your new screen.
Planet CNC Main Screen
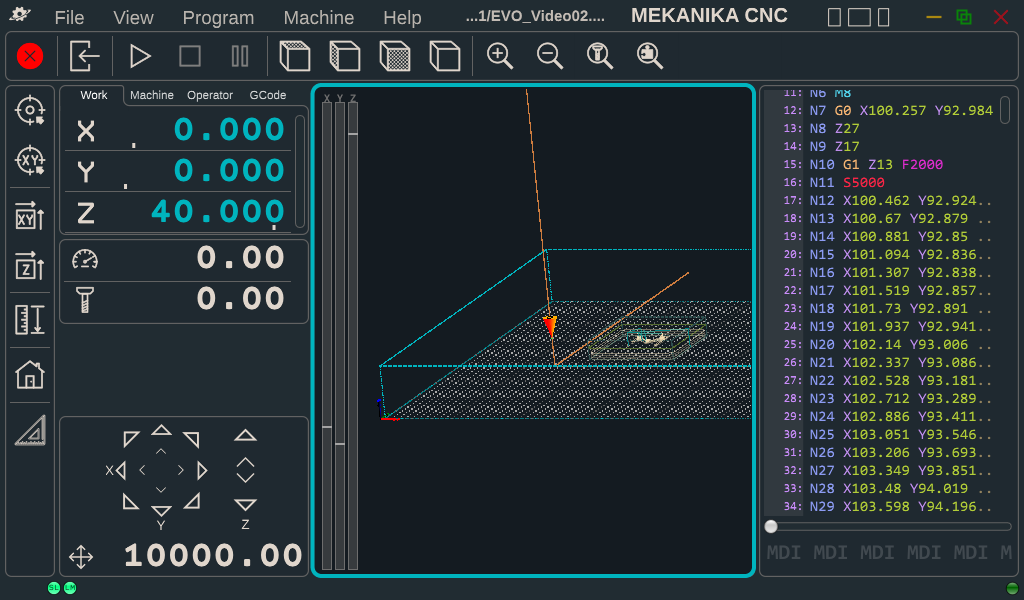
When you turn on the machine, PlanetCNC will automatically start after a few seconds and you will arrive on the screen shown below.
Here is an overview of the different areas and functionalities of the software:

- X, Y & Z axes current position (working and absolute coordinates of the machine)
- Real-time machine travel speed & spindle rotation speed (Feed & Speed)
- Manual travel speed of the machine and controls (Jog)
- General menu
- G-code control menu (Play, Pause, Stop,...)
- Machine actions menu (Homing, Tool measure length,...)
- Graphical interface & 3D view
- G-code panel (current loaded code)
- G-code command line (MDI)
Some functionalities of PlanetCNC are only accessible using the touchscreen, but the most important ones can be quickly activated using the keypad. These functionalities share the same icons on the screen and on the keys.
Axis Coordinates
The first section of the screen displays the real-time coordinates of the machine. There are two types of coordinates that you will use:
- Working coordinates (in blue), representing the position of the tool relative to the work origin point set by the user.
- Machine coordinates (in green) representing the position of the tool relative to the machine origin, X0 Y0 Z0 located at the front bottom left of the machine.
You can toggle between the two using the tabs, as shown on the images below.


Feed & Speed
The second section of the screen displays two values: the current travel speed of the machine (also called Feed - the counter icon) and the rotation speed of the spindle (also called Speed - the spindle icon), as defined inside the G-code that is loaded in the program.
If you click on the icons, the section expands and shows new functions. They allow you to increase/decrease the feed & speed in real-time in 10% increments, while it is working and reading a G-code.
For instance, in the image below, the machine is supposed to travel at a speed of 2000mm/min (Feed F2000 in the G-Code), but the working feed was set to 70% so the machine is actually running at 1400mm/min.

This allows you to fine-tune your feeds and speed during a job, in case you notice your G-code parameters are not optimal.
Be careful: 10% can be a big change in certain conditions. Changing feeds and speeds during a milling operation can lead to some trouble if not made carefully.
Machine Jog
The jog section allows you to move your machine freely, at a certain speed. This speed can be changed by double-clicking on the number indicated in the image below.
To move the machine, press on the arrows on the touchscreen or use the corresponding keys on the keypad:

The top bar contains shortcuts to 5 contextual menus, in which you can find all the detailed functionalities of PlanetCNC, including the language preferences and the settings.
We will not detail all of them here, but if you want to know more about each of these, you can find all the information you need inside the PlanetCNC TNG documentation, which can be downloaded on the support page of our website.

G-Code Control

These 4 buttons allow you to:
- Load a G-Code
- Start the G-Code
- Stop the G-Code (can't be resumed and machine can be moved manually)
- Pause the G-Code (can be resumed but machine can't be moved manually)
And the keypad has keys as shortcuts for those actions:

Machine Actions
These are the buttons used to send/receive information to/from the machine.

Among these 8 actions, 4 of them are available on the keypad as well (with similar icons):

Graphical Interface
In the middle of the screen, you will find a 3D view representing the reachable XYZ working volume of the machine. The orange (or yellow) cone represents the tool center(it is a circle in top view), so the central point of the machine from which all coordinates are calculated.
Its size is not linked to the diameter of the tool, it only represents the center of the tool.
If a G-code is loaded, the graphical interface will also display the toolpath that the machine will follow to mill that part.

The toolbar located on top can be used to change the views (top, side,...), but also to zoom on the workpiece, on the tool, or to show the entire workpiece.

G-Code Panel & MDI
The last section of the screen, on the right, is used to display the loaded G-code (if it is not visible, you can display it with the buttons representing the 3 view panel in the top right).
You can use it to browse your code, to execute it line by line, or even to start operations in the middle of it (more info in this dedicated article), using the menu as shown in the picture below (which can be useful to recover a job after a crash, or power outage... etc.).
Use this function only if you are confident with its usage! Starting a code from a wrong line or machine position can lead to unpredictable machine movements and/or tool crashes into the table for instance! Read the dedicated article for more info.

At the bottom of this section, you can find a command line field, also called MDI, that is used to type G-code manually and send it directly to the machine. For instance, the command shown below will move the machine at maximal speed to the working coordinates X50 and Y100.
If you want to know more about this, you can find all the information you need inside the PlanetCNC G-code documentation, which can be downloaded on the support page of our website.

Touchscreen Usage
Mekanika machines run on a Raspberry Pi that is directly connected to your control interface. It means that you can use it as you wish to organise your files, browse the web, etc. You can access the desktop by minimizing the window of PlanetCNC.

Like with a smartphone, if you want to open a file or a program, simply press the icon once. If you want to right-click, press the icon longer and the contextual menu will appear. Lastly, if you need to type some text, you can open the virtual keyboard by clicking on the taskbar icon.


